Ok - in pursuit of the perfect steak I have decided to try out the sous vide method.
But I do not want to spend a fortune, so have been looking at loads of DIY options.
Given that I have VERY limited electronics knowledge, I wanted more of a plug and play type set up even if it did cost a little more than pure DIY.
So here's what I've gone for:
- A rice cooker
You need a cheap one which can be switched & off simply by the power socket i.e. without fancy electronics. I got one for £21 delivered with a 2.5l capacity. This will, obviously, form the water bath & heating component.
- A temperature controller & thermometer
You can buy separate PIDs, solid state relays & thermometers for this. But I found the following all in one solution which will simply require me to wire in the components I want to use with it - and it is pretty cheap at £20 delivered: http://www.ebay.co.uk/itm/230615343778? ... 1497.l2649
All I will then need to do is:
- wire in the 240V power to the controller;
- wire in the output. I intend to use an extension cable with a few sockets on the end of it;
- mount the unit in a box (this will be the fiddly bit for me). Although the blurb says this is not needed, it will give me a little more comfort given that 240V will be wired in & out of the unit. I'll buy something from Maplin for this I think, unless anyone has any better ideas.
That 'should' give me a very quick & simple sous vide machine for around £40 (plus the box I go for to house this in).
Will report back once all the bits are here & I've tried it out - should be by end of next week....
Cheers,
Simon
DIY (ish) sous vide for £40-ish
-
KamadoSimon
- Rubbed and Ready

- Posts: 527
- Joined: 25 Mar 2012, 14:00
- First Name: Simon Godfrey
- Location: Berkshire
-
keith157

- Moderator

- Posts: 3816
- Joined: 05 Aug 2011, 13:35
- First Name: Keith
- Location: Stevenage, Herts
Re: DIY (ish) sous vide for £40-ish
Good luck Simon, lots of pictures and explanaitions (suitable for a 7 year old technophobe) please 
-
Steve

- Site Admin

- Posts: 1828
- Joined: 17 Oct 2009, 12:17
- First Name: Steve Heyes
- Sense of Humor: Sarcastic, Filthy
- Location: Reading, Berkshire, UK.
- Contact:
Re: DIY (ish) sous vide for £40-ish
Good find on the controller, it looks like an ideal unit for a sous vide, assuming it keeps temperatures steady or has configurable PID settings.
There are better project boxes available on eBay than in Maplin. There are four piece boxes which are easier to drill/punch/cut than the Maplin ones. I've just used two I bought this week and they were much quicker to work with.
This is the variant I've been using but other sizes are available
http://www.ebay.co.uk/itm/251031905688? ... 490wt_1396
-
KamadoSimon
- Rubbed and Ready
- Posts: 527
- Joined: 25 Mar 2012, 14:00
- First Name: Simon Godfrey
- Location: Berkshire
Re: DIY (ish) sous vide for £40-ish
Perfect - thanks Steve - will wait till i get the controller & can measure up & see how it is meant to be mounted in the cases.
The downside of this controller is that it doesn't look like it can be used as a pit controller (the max temperature control is to 99C) - but at £20 delivered I thought I'd give it a go. We'll see if it is reasonably accurate - should be as it is meant for fish tank heating control ! But I will test it using the Maverick as well.
The downside of this controller is that it doesn't look like it can be used as a pit controller (the max temperature control is to 99C) - but at £20 delivered I thought I'd give it a go. We'll see if it is reasonably accurate - should be as it is meant for fish tank heating control ! But I will test it using the Maverick as well.
-
Steve
- Site Admin
- Posts: 1828
- Joined: 17 Oct 2009, 12:17
- First Name: Steve Heyes
- Sense of Humor: Sarcastic, Filthy
- Location: Reading, Berkshire, UK.
- Contact:
Re: DIY (ish) sous vide for £40-ish
Have you got a Thermapen? If so test against that, the mavericks like to wander a bit.
I reckon that controller will be perfect for a water bath. I built mine with the same parts I've used for pit controllers but that was only because I bought several of them and had a spare lying around. I'm actually tempted to grab one of those that you found anyway. At that price it's a steal.
I reckon that controller will be perfect for a water bath. I built mine with the same parts I've used for pit controllers but that was only because I bought several of them and had a spare lying around. I'm actually tempted to grab one of those that you found anyway. At that price it's a steal.
-
keith157
- Moderator
- Posts: 3816
- Joined: 05 Aug 2011, 13:35
- First Name: Keith
- Location: Stevenage, Herts
Re: DIY (ish) sous vide for £40-ish
I must admit to looking forward to the end result, then bribing my daughter, her beau or wife's brother to build it on the promise of good food 

-
KamadoSimon
- Rubbed and Ready
- Posts: 527
- Joined: 25 Mar 2012, 14:00
- First Name: Simon Godfrey
- Location: Berkshire
Re: DIY (ish) sous vide for £40-ish
Ok - so the components are here - except the box for house the control unit.
First thing I did was to plug the rice cooker into the power & switch it to cook mode. Then I toggled the on/off switch on the wall to check that it came back on without any electronics getting in the way. It did - perfect because it means the controller box will be able to switch it on and off to control the temperature.
Get your components together:
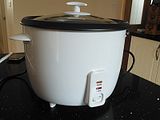
The rice cooker:
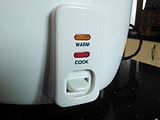
Close up of the comprehensive rice cooker controls
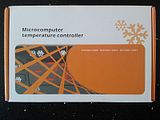
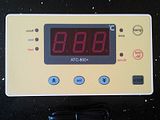
Temperature controller arrived:
Temperature controller front view:
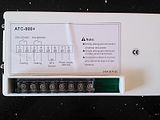
Temperature controller rear view:
In addition, you'll need a standard extension cable & some terminal block. This will be used to:

Steps:
- Cut the socket end of your extension cable, leaving some cable still attached. The length to leave is the amount between your temperature controller & the extension socket for your rice cooker to plug into;
- Cut the plug end of your extension cable, leaving enough cable still attached for the length of power cord you want from the wall outlet to your temperature controller;
- Hopefully this leaves you with some cable left over, from which you will extract the wires inside the cable housing - I used about 10cm of the live, neutral & earth.
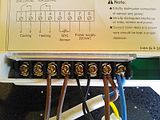
The wiring:
1 - the temperature probe is wired into sockets 5 & 6 of the temperature controller;
2 - the cable with the plug still attached gets wired into sockets 7 & 8 on the temperature controller. There is no earth on the temperature controller, so I wired this into a connector block;
3 - the cable with the extension socket still attached gets wired into connector block;
4 - the 10cm piece of live cable gets wired to sockets 4 & 7. You can see this loop of the brown wire in the picture above.
5 -the connector block now attached to the extension socket cable now gets wired into the following sockets:
- live cable goes to socket 3 of the temperature controller;
- neutral goes to socket 8 of the temperature controller;
- earth goes to the same connector block that the earth went to in step 2.
Check your wiring - you are using 240V here & it has the potentially to really hurt or even kill. BE CAREFUL. I checked visually & also gave each wire a decent tug to ensure it was firmly connected & wasn't going to come out of its own accord.
When you have checked your wiring. And then double checked it, plug in the temperature controller & stand back. Hopefully nothing went bang or pop & the display of the temperature controller will have lit up.
I then filled my rice cooker with hot tap water. I took the temperature of it with a thermapen & then placed the temperature controller thermometer into the water & checked that there was a pretty similar temperature being displayed. There was - so no adjustment needed.
I then plugged the rice cooker into the extension socket.
Then set the temperature you want the temperature controller to get the water in the rice cooker to - I did my test with 55c.
The water in the rice cooker was below 55c, this was already registered by the temperature controller, so it switched the rice cooker on & started to heat the water. It switched off again once the temperature had been hit. BUT..
The water temperature continued to rise above 55c - this is because the heating element transferring heat through the water bowl continued to heat even though it was switched off. This led to an overshoot of between 4 & 5 degrees C. The temperature controller unit recognised this & tried to switch on cooling for which there is an output on the unit. But I haven't attacehd anything, so in reality it just sat there waiting for the water to drop to a certain temperature. I think it has a learning mode - but not sure. Need to play with it some more tonight - but it didn't start heating again when the temperature dropped below 55c - instead it waited until 52C i.e. 3C below the set temperature. I do not know at the moment whether this is the unit learning, or whether this offset is user-set. Will report back.
Right, off to order a box to house the temperature controller to a) make it a look a little less home-grown & b) move all those 240V connections safe & sound out of the way.
First thing I did was to plug the rice cooker into the power & switch it to cook mode. Then I toggled the on/off switch on the wall to check that it came back on without any electronics getting in the way. It did - perfect because it means the controller box will be able to switch it on and off to control the temperature.
Get your components together:
The rice cooker:

Close up of the comprehensive rice cooker controls

Temperature controller arrived:

Temperature controller front view:

Temperature controller rear view:

In addition, you'll need a standard extension cable & some terminal block. This will be used to:
- provide power to the temperature controller (plug + lead)
- power your rice cooker (socket plus cable)
- bridge the temperature controller live cable connections on the rear of the unit (some of the wire cut into smaller sections)


Steps:
- Cut the socket end of your extension cable, leaving some cable still attached. The length to leave is the amount between your temperature controller & the extension socket for your rice cooker to plug into;
- Cut the plug end of your extension cable, leaving enough cable still attached for the length of power cord you want from the wall outlet to your temperature controller;
- Hopefully this leaves you with some cable left over, from which you will extract the wires inside the cable housing - I used about 10cm of the live, neutral & earth.
The wiring:
1 - the temperature probe is wired into sockets 5 & 6 of the temperature controller;
2 - the cable with the plug still attached gets wired into sockets 7 & 8 on the temperature controller. There is no earth on the temperature controller, so I wired this into a connector block;
3 - the cable with the extension socket still attached gets wired into connector block;
4 - the 10cm piece of live cable gets wired to sockets 4 & 7. You can see this loop of the brown wire in the picture above.
5 -the connector block now attached to the extension socket cable now gets wired into the following sockets:
- live cable goes to socket 3 of the temperature controller;
- neutral goes to socket 8 of the temperature controller;
- earth goes to the same connector block that the earth went to in step 2.
Check your wiring - you are using 240V here & it has the potentially to really hurt or even kill. BE CAREFUL. I checked visually & also gave each wire a decent tug to ensure it was firmly connected & wasn't going to come out of its own accord.
When you have checked your wiring. And then double checked it, plug in the temperature controller & stand back. Hopefully nothing went bang or pop & the display of the temperature controller will have lit up.
I then filled my rice cooker with hot tap water. I took the temperature of it with a thermapen & then placed the temperature controller thermometer into the water & checked that there was a pretty similar temperature being displayed. There was - so no adjustment needed.
I then plugged the rice cooker into the extension socket.
Then set the temperature you want the temperature controller to get the water in the rice cooker to - I did my test with 55c.
The water in the rice cooker was below 55c, this was already registered by the temperature controller, so it switched the rice cooker on & started to heat the water. It switched off again once the temperature had been hit. BUT..
The water temperature continued to rise above 55c - this is because the heating element transferring heat through the water bowl continued to heat even though it was switched off. This led to an overshoot of between 4 & 5 degrees C. The temperature controller unit recognised this & tried to switch on cooling for which there is an output on the unit. But I haven't attacehd anything, so in reality it just sat there waiting for the water to drop to a certain temperature. I think it has a learning mode - but not sure. Need to play with it some more tonight - but it didn't start heating again when the temperature dropped below 55c - instead it waited until 52C i.e. 3C below the set temperature. I do not know at the moment whether this is the unit learning, or whether this offset is user-set. Will report back.
Right, off to order a box to house the temperature controller to a) make it a look a little less home-grown & b) move all those 240V connections safe & sound out of the way.
-
JEC
- Moderator
- Posts: 1275
- Joined: 19 May 2010, 19:25
- First Name: Justin
- Location: Sunny (sometimes) North Devon
Re: DIY (ish) sous vide for £40-ish
Nice little write up Simon, you were lucky to get this unit at that price, they have no more stock and everyone else on eBay wants twice what you paid. Hope it works out the temperature control patern, if it's PID based it should do. I can't believe how far we have moved away from caveman cooking
-
KamadoSimon
- Rubbed and Ready
- Posts: 527
- Joined: 25 Mar 2012, 14:00
- First Name: Simon Godfrey
- Location: Berkshire
Re: DIY (ish) sous vide for £40-ish
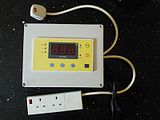
Mounted in project box & cabling tidied up and away.
Going to be used in anger on a rump steak this evening to bring it to medium rare.
Final thing I need to do is mount waterproof sealing grommets on each side of the box for the power in / power out / termometer. Have the grommets, just didn't have the correct size drill bit grrrrrrr.
S.

Going to be used in anger on a rump steak this evening to bring it to medium rare.
Final thing I need to do is mount waterproof sealing grommets on each side of the box for the power in / power out / termometer. Have the grommets, just didn't have the correct size drill bit grrrrrrr.
S.
-
KamadoSimon
- Rubbed and Ready
- Posts: 527
- Joined: 25 Mar 2012, 14:00
- First Name: Simon Godfrey
- Location: Berkshire
Re: DIY (ish) sous vide for £40-ish
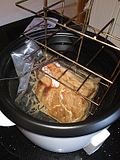
Ok - so first test with food on Friday night steak. Rump steak for searing on the grill after being in the water bath at circa 50-55C for 4 hours. According to Mr Sous Vide himself (http://www.douglasbaldwin.com/sous-vide.html#Beef), a 25mm steak should take around 3 hours to get to 55C starting at 5C and in a water bath of 55C. I decided to go for slightly longer on the cook just to see for myself that this really works and at a slightly lower temperature (50f) to be on the side of rare of medium rare.
I used a rib rack to hold the meat in the water off the bottom of the rice cooker and also to stop it floating to the top.
When i was ready to finish the steak off on the grill, i poked a thermapen through the plastic - 52f. I then cut the steak in two - perfectly medium rare - just looked unappetising!
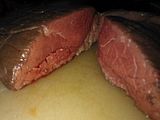
The extra 2F comes from the fact that the unit consistently over-shot the heating of 50F - but it was very consistently over shooting, so easy to manage.
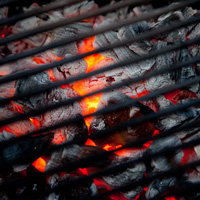
I then seared each side for 10 seconds or so at around 500f to make it look nicer and taste nicer courtesy of the maillard effect:
Sliced on the pate:
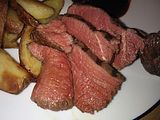
Looked great. But there were problems:
1 - it wasn't warm enough for our liking;
2 - it didn't have enough of the smokey flavour that cooking it fully on the BBQ does.
Bit disappointed - but will try again, but next time will have on BBQ for longer to get some more charing and also to heat it a little more.
I used a rib rack to hold the meat in the water off the bottom of the rice cooker and also to stop it floating to the top.

When i was ready to finish the steak off on the grill, i poked a thermapen through the plastic - 52f. I then cut the steak in two - perfectly medium rare - just looked unappetising!

The extra 2F comes from the fact that the unit consistently over-shot the heating of 50F - but it was very consistently over shooting, so easy to manage.
I then seared each side for 10 seconds or so at around 500f to make it look nicer and taste nicer courtesy of the maillard effect:
Sliced on the pate:

Looked great. But there were problems:
1 - it wasn't warm enough for our liking;
2 - it didn't have enough of the smokey flavour that cooking it fully on the BBQ does.
Bit disappointed - but will try again, but next time will have on BBQ for longer to get some more charing and also to heat it a little more.